Wednesday 17 February 2016

The Orca From Jaws

The Hi All

I have been wanting to build the boat from jaws for a number of years now, but never found the time
until now. i looked all over the Internet for plans on this project but really struggled to find something that i could use i eventually stumbled across this site http://www.airagestore.com/plans/rc-boats/scale/the-orca-fishing-boat.html so i placed my order it took a while to come through as it was from the USA.
Finally the day arrived and i had my plans, the wife thought i was mad, i looked over them for a few weeks before i started to see the best way to begin.

The Beginning

The plans are very good quality, i chose not to cut out the templates on the plans and to use tracing paper and then transfer them to 3mm plywood. Unfortunately i only started taking pictures once the hull section was built.
HULL SECTION GLUED TOGETHER


Once the main interior bulk heads were all glued together, i started to glue the outer pieces of ply to the bulkheads. i ended up making a small jig which was a flat piece of wood with holes drilled into it, which i could insert dowels to help bend the ply prior to me fixing them as on my first attempt the wood simply snapped, so the jig is worth building.Now i am not going to bore you all with the rest so take a look at the next few pictures to see the progress so far
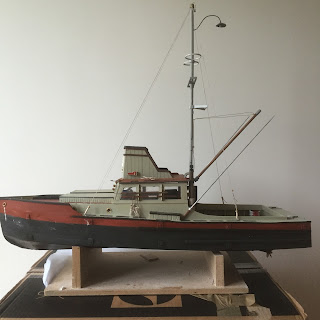


 I still have a long way to go yet starting with the bow section and getting the bowsprit constructed and a lot more detail to add that's after i have watched the film again!
check back later for the finished boat

Ok further developments 
I was going to make the barrels by hand but then decided to pull in a favour and got a friend to make them on his 3D printer the results were great.


Thursday 26 November 2015

Christmas cottage

Hi All

This is a little project i have been meaning to do for a while, my wife bought some Christmas ornaments a few years age now, and would put them out on the window sill. And i kept on saying they look silly on there own we should make a little seen for them, so this year i decided to have a go.

Materials

Foam board
Pva Glue
1/8" Balsa wood
Glue gun
Paint
Glitter
Bicarbonate of soda ( secret weapon )
Paint
Basic shape


First job was to mark out my cottage shape this from a random picture. Foam board can be picked up from any good hobby store and is really easy to cut with a craft knife, 
The next step is to cover the outer face with thin strips of balsa wood which gave the cottage a ship lap style finish, i also added a wall paper effect on the inside as i was going to light up the inside with LED later.
Once all the walls were covered i then glued everything together to give me the basic shape of the cottage
I then added a few little items inside which  i could not get to once the roof was on
fire place and christmas tree, this room would be  illuminated with a couple of LED.

i started to paint the outer building and add a row of LED lights as this would have been difficult to do with the roof in place.
i decided to decorate the outside up with a garland, to do this i first marked out the basic shape on to a piece of thin card. i then used spray glue on the card and then added small amounts of scenery scatter then spraying more glue and adding more scatter until i achieved  the desired effect http://www.amazon.co.uk/Busch-7190-Scenery-Construction-Set/dp/B0002OHB7O/ref=sr_1_7?ie=UTF8&qid=1448436523&sr=8-7&keywords=model+railway+scenery+scatter 

Once i was happy with the basic structure i glued down the cottage on to another piece of foam board. i added plants trees and bushes around the base.

Now to create the snow effect

For this i had to create the illusion of depth and thickness, so i used polystyrene i fitted it everywhere i was going to cover with snow IE the roof and the ground. i smoothed of the edges on the roof and cut around the bushes and trees.


the snow was made by mixing PVA glue with sodium bicarbonate i mixed it into a thick past that was pourable i then started to pour it over the ground and roof area taking care not to let it run and drip from the roof area. Once it had dried which took a couple of days i noticed it had a yellow stain, this was fixed by painting it with white acrylic paint i also sprinkled over it some fine white glitter.
As you can see in the dark it looks great and realistic.